Hi, this is Wayne again with a topic “Weekend Projects: Visualizing Sound with a Chladni Plate”.
This week, we’ll be building a tool for visualizing standing waves in a metal plate also called a clodney plate. It’S one of those classic physics demonstrations, but it’s also a ton of fun to play with the original cladding plate was built by early acoustics researcher ernst cladney with sand sprinkled on glass and metal plates. He would run a violin bow across the edge, so they would vibrate at their resonant frequency, causing the sand to jump into different patterns in this modern version. Inspired by many other builds we’ll make things a little more intense by using a subwoofer instead to build the clotting plate.
You’Ll need these parts and these tools begin by using a drill to enlarge the speaker mounting holes to fit the threaded rods then cut a piece of plywood a bit larger than your speaker to serve as the base position, the speaker on the board and mark the Mounting holes, then drill them out for the threaded rods cut a lexan sheet to the same size as the plywood base then use the base as a template to drill out matching holes in the lexan in the very center of the lexan sheet drill, a hole for The bushing then glue it in place with hot glue, use four pieces of threaded rod to attach the speaker to the wood base, cut them to length and fasten them to the wood and the speaker. Using nuts and lock washers drill a hole in the end cap. For the threaded rod and place it onto the center of the speaker measure the distance from the end cap to the top of the threaded rods and add about an inch and a half to this length.
Cut the remaining threaded rod to this length and attach it to the end cap, using lock, washers and nuts before gluing. The end cap to the speaker add nuts to the threaded rods for the lexan sheet to rest on apply hot glue to the bottom of the end cap and then use a lexan sheet as a guide to align the end cap with the threaded rod passing through The bushing and the sheet in place the end cap should be reasonably centered, use nuts and lock washers to attach the lexan on the sheet metal mark and cut a square about 12 inches across mark the center of the plate and drill a hole to match. The threaded rod use nuts and lock washers to attach the plate to the threaded rod, and the assembly is done wire up your amp, the speaker using wire and spade connectors and prepare a frequency source. Many tone generating apps are available for phones.
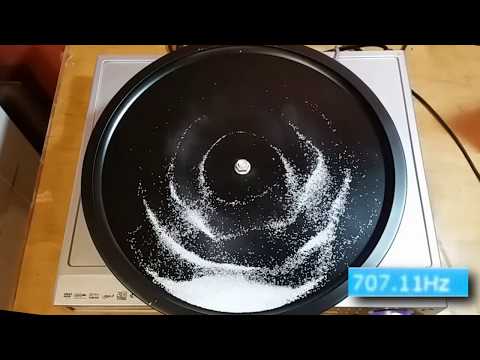
The key thing is to be able to sweep the frequencies rather than presets, which allow more interesting patterns. We’Re using fine sand to reveal the vibrations on our plate, but any fine and dry powder will work to minimize friction. Rubbing a bit of graphite powder onto the surface will help the sand slide around, so the patterns appear faster once everything is set, turn on the amp and create some acoustic patterns. Try ramping up the frequency to find more complex patterns. These patterns occur when the speaker vibrates at the resonant frequency of the plate, or one of its harmonics as the plate vibrates at its resonant frequency, a standing wave is set up within the plate with some parts of the plate.
Staying still while others move the sand. Naturally, falls towards these nodes and a pattern is formed. This means the plates of different shapes and harmonics at higher frequencies will create different patterns. You can experiment with different shaped plates or, if you play an electronic instrument hook it up to the plate and play yourself. Some patterns personally i’d love to watch a theremin played through a clodney plate. If you build one, be sure to take some pictures and video and let us know in the comments, we’d love to see your builds and what you do with them.
Alright, let’s take some time to review some of the feedback we got on our last weekend: project the anti-theft backpack. Now a lot of people said if you’re gon na tie something to the bench anyway. Why not just tie the backpack to it or use a bike? Lock or something like that, that’s a really good point, and sometimes we get so caught up in just trying to solve a problem in a new way that we just have to create something and show it to you guys and that’s totally fine. Our projects aren’t always meant to be like finished.

Polished, builds, they’re, inspirational, we’d love for you guys to improve them. Give us feedback on that sort of stuff. Some of the comments actually made reference to using this on a bicycle instead of a backpack, and i think that’s a great application. Somebody even mentioned you could add a little momentary, switch and turn it into a bicycle bell too fantastic. We love it when you guys improve on our ideas like this again.
These are just inspirational projects. We love your feedback, we love your comments, so keep them coming. We really appreciate it. Alright, that’s it for this time, we’ll see you in the next weekend project. If you liked this video subscribe to our website or send us a comment on facebook or twitter be sure to check out our other project videos or visit us on makezine.com, you .