
Hi, this is Wayne again with a topic “Using the Excel ROUND Functions”.
In this Excel video, I will demonstrate the round functions in Microsoft Excel so here at the left. We have some numbers and you can see that there’s way too much exactness in these numbers way too many decimal points. So how could we simply round these numbers to an integer? Now some of you may be thinking? Why don’t you just select a number go to the Home tab and look in the number group and then decrease the number of decimals shown? If I do that, look it just says 135, but the catch is. This cell does not really have the number 135 in it. When you select the cell up here on the formula bar, you see the real truth.
That’S one thing: that’s great about the formula bar: it always shows you the actual contents of the cell. So you can see this is not just 135, it still has those decimals in place, and so, if I add the contents of this cell to the contents of another other cell, those decimals will come into play and be added. All we’re doing here is changing the formatting of the number, so I’m going to undo that I’ll just hold Ctrl and tap Z several times to get back to the way it was now. Let’S try rounding using Excel functions, so I’ve clicked here on Cell C3 and I’ll type equals round, and you can see our four round functions appear and you can click on each one to get a little description from Excel. But I’m going to start just with a simple round function: I’ll put in the left parenthesis Excel is now asking for the number and I could type in the number or I could type in the cell reference B3 or I could just click on it. Any of those three options will work just fine next I’ll put in my comma, because I am required to now put in this second argument.
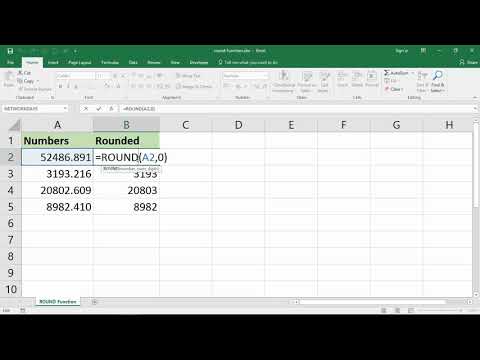
The number of digits that I want to have after the decimal point. So if I put 2 here put in my right parenthesis and tap enter, I get the number rounded and to two decimal places, two numbers to the right of the decimal point. Now, if I want to, I could select the cell C3 and double click on the autofill handle to apply that same formula all the way down my spreadsheet. Now, if I click on C3 again, I can go up to the formula bar to easily change this formula. I could have said one decimal place tap enter and I just get one.

I can apply that down the spreadsheet. I could have said five decimal places or I could have just put in zero. Decimal places tap enter on the keyboard and now it’s rounded to an integer.
Now, if you look closely, it follows the typical rounding conventions. If the decimal part of the number is below 5, then it’s rounded down. If it’s five or up it’s rounded up, so you can see this number was rounded up and this number was rounded down. Okay.
Next, let’s look at the round down function function. Let’S do the same exact formula except this time: use round down so I’ll type in round down Excel, explains what it is round down will round a number down towards zero, so equals round down. Left parenthesis I’m going to select B3 as the number I’ll put in comma and the number of digits we’re going to keep that at 0 right parenthesis tap enter and I still get 135. But if I double click on the autofill handle you’ll see some slightly different results. So in the case of B4 78.76 in column C that was rounded up to 79 in column D, it was rounded down to 78 because I used the round down function.
It doesn’t matter how close this number was to 79, that doesn’t matter it wasn’t 79, so it was rounded down to the integer. Let’S try round up and see how that works. I bet you can guess equals Roundup Roundup will round a number up away from zero left parenthesis. I’Ll select, B3 comma number of digits 0 right parenthesis tap enter. I get 136 and I’ll double click on the autofill handle to apply the formula down the spreadsheet and it did exactly what you would have expected.
The results are different than what I got in column C, with the round function and column D with the round down function. When I used the Roundup function, every number that had a decimal and then numbers after it was rounded up to the next whole number. The next integer so 909, 181 639. It worked every time to round up to the next whole number. Our final round function in Microsoft. Excel is a little trickier.
It’S called m round, let’s type it in and Excel will Define what it does m round returns. A number rounded to the desired multiple, so I’ll put in my left parenthesis. What’S the number I’m still going to use B3 comma and then what’s the multiple I’m going to put the number 5.? Let’S take a look at this, so I put in the right parenthesis tap enter. It looks like I got the exact same results as column C and column D, but if I apply this down the spreadsheet by double clicking on the autofill handle you’ll see some very different results. What’S Happening Here is Excel is looking at the number in question and is rounding it either up or down until it hits a multiple of five. If you remember, we put in 5 here so with this number, it was easy to round down to get to a multiple of five for this one.
It was easier for Excel to round up to 80 to get to a multiple of five. With this number, it was easier for Excel to round down to 910 to get a multiple of five, so you can play around with this m round function. If you want to learn more about how it works, you could put in two or three as the multiple. Let’S see what happens there, if, if I click on Cell F3, double click on the autofill handle it copies it down and the numbers are adjusted.
These numbers are now being rounded up or down to the nearest number. That’S a multiple of three. We could even try changing it to zero. Let’S try that I bet you can guess.
What’S going to happen when I autofill that number down all of the numbers turn to zero. Why? Because the only multiple of zero is zero. I’M going to undo that, but in this article we’ve looked at four round functions that we have in Microsoft Excel. These will come in handy as you use Excel more and more thanks for watching.
I hope you found this tutorial to be helpful. If you did please like follow And subscribe, and when you do click the bell and you’ll be notified when I post another video, if you’d like to support my channel, consider clicking the thanks button below the video or you could support me through my patreon account or By buying Channel merch and you’ll see information about those options in the description below the video. Thank you. .