
Hi, this is Wayne again with a topic “The Black and Gold PC Build”.
Goddamnit, so this video, I thought we could build an ole AMD PC for gaming, comfortably in 1440p streaming as well as editing. I have yet to do a black and gold build on the channel, so that is what the color scheme will be of this PC. Let’S get started, join the custom cooling revolution with the courser hydro x. Series featuring every part.
You’Ll need to make your pc stand out with a gorgeous custom. Cooling system experience, powerful cooling with minimal noise, easy setup and automated control for efficient fan and pump speeds choose from a range of water blocks for the latest gravis cards, including the NVIDIA GeForce r-tx, 2080 and 28 ETI for more info click, the link below alright. So on this build we’re going with none other than the AMD risin 7 3800 X. This is currently the best 8 core 16 thread CPU. You can buy right now from AMD and, of course, we’re gon na overclock it.
So we do need a solid, a IO to get the job done. I decided to go with the master liquid ml 240 R this time around, but I think I’m gon na swap the fans for the Corsair ones, just because I like the setup process, and the software from course, are a lot better than these no offense to you. Guys at Coolermaster the motherboard we’re going with actually is perfect for this build for several reasons. It has all the bells and whistles you can expect from a high-end motherboard.
It has two eight pin EPC connectors, which is going to help out for a stable and smooth overclock. It’S got built-in Wi-Fi and PCI gen4 support we’re actually going to be going with the MP 600 from Corsair. This is a one terabyte nvme PCIe gen am 2 SSD. So we’ll take advantage of these incredible read and write speeds on the x5 70 chipset check this out, guys almost half a gigabyte per second read and up to 40 to 50 megabytes per second write.
That is insanely fast, but of course, I’m going to test out the speeds after a system is done to see if these numbers are even accurate. Another really cool feature of this board is the extended heat pipe design, which runs across the mass heat sinks to the chipset heatsink, which helps with thermal dissipation. But what sets this board apart from other competitors like Asus, gigabyte and even asrock, is the placement of their chipset fan? Have you guys even noticed that, on almost all the other motherboard manufacturers, the chipset fan, is located right near the top PCI slot and what it usually goes on the top PCI slots I’ll give you guys a hint, the first three letters start with GPU. So when you plug in your GPU you’re automatically covering the fan, which then restricts the air flow, but Emma’s design team caught this flaw and repositioned their fans closer to the bottom, so that the GPU doesn’t interfere with the air flow in order to game comfortably.
In 1440p I went with the 5700 XT, which also has the best value, but I did pick up the Evoque from MSI, because, obviously it’s in gold, I can’t think of any other Ram in the world that would fit perfectly in this build other than the G Skill Trident z-boy, L, so who’s gon na toss in all 32 gigs of these beauties in here and powering the system is a 750 watt power supply from coolermaster and, finally, everything is going inside the MSI MPG sukira 500 g. I don’t even know a mess. I made cases until this arrived at the office last week. To be honest, so this is a fully TX chassis with tempered glass panels on a hinge on both sides. It also has two massive 200 millimeter fans in the front for intake and an extractable bracket that supports up to a three sixty millimeter radiator. Oh, I almost forgot about the cables.
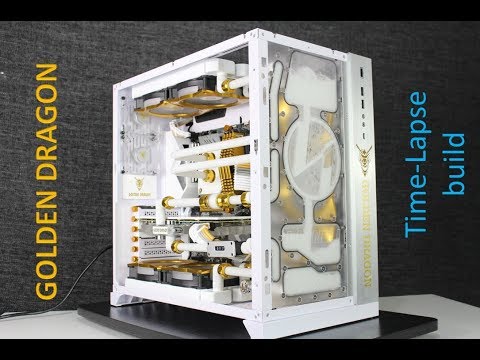
Of course we got to spice it up with some custom cables from cable mod. It did add some new aluminum kala combs, so I went with the gold ones, which I think it’s gon na look really good in the build honestly. It looks really good in my mind, but I can finish the build and then it could look like a pile of turd. So you never really know what these things until it’s done, but anyways, let’s begin it’s.

Obviously, the first thing to do is test out all the components make sure everything is functioning before you throw it inside the case, because there are times where something can be defective and it becomes pretty difficult to diagnose. So it’s better to have all the components outside of the case. I’Ve learned that from my past mistakes, but anyways everything is hooked up here.

Now, I’m gon na show you guys a really cool trick where you can turn on your system without a physical power button. You can boot your system using a screw driver or any pointy metal piece. So what you have to do is find a connector on the motherboard to label the jfp one and what you’re gon na do is use the tip of your screwdriver or whatever metal piece.
You’Re using and touch the third and fourth pins on the top row, just like this, just like that it turns on and obviously what we’re looking for is host or booting to BIOS there we go all right so officially in BIOS, which means we are golden. That was good, come on. That was good, get it because it’s a black and gold build I’ll. Just I’ll just delete my channel all right. It’S going to install storage, one terabyte is plenty to download and benchmark all the games. Just like that. Okay, you know wish there was more gold accents inside the case. Maybe the grommets could’ve been gold or the PCI brackets.
Here I feel like it’s just too much black. Don’T need this hard drive cage. Am I using any hard drives? Also, it’s gon na look a lot cleaner without this here. Oh it just slides right off nice.
I guess technically, we don’t need this. Ssd tray here might as well just get everything out of here that we’re not gon na use. I love the fact that there are grommets down here for cable management. We got three over here on this side, so it’s gon na look really clean at the end. So I guess now we can put on the cooler. So let’s grab that real quick.
I absolutely love the fact that you can remove the top radiator brackets. You can slap on the radiator and then insert it back in this is super convenient. Oh no.
These are gon na throw off. The color scheme did not pay attention to that. This can’t do guys.
I cannot use those fans, I’m gon na have to use the ll fans actually yep. These will do alright, so the fans are now installed. Now we got ta hook it up to this bracket over here, so it’s tested.
I will quick make sure, there’s plenty of space so slide. This back in yeah looks like there is plenty of space actually, but the rear fan and the tubing so plenty of clearance. They are not gon na interfere. This is actually perfect. Actually, while we’re at it. Let’S hook up the CPU cables, why not? Oh my god! I love these grommets up here seriously. Perfect. All these cable combs are sweet. Alright, let’s play another one.
Oh my god looks nice. Alright, I guess we can do the cooler now. So, let’s light this back in, oh my god, look how easy that was! That’S just can’t get over it honestly! Alright! Now, for this part, let’s peel this off I’ll make the same mistake like last time: 32 gigs of these bad boys, 2. 3. .