Hi, this is Wayne again with a topic “Rheoscopic Disc Coffee Table”.
If you ever go to visit a science museum chances are they’ve got a big interactive, exhibit with a clear table full of swirly churning pearlescent fluid, as you rotate the table. The fluid swirls about mimicking a tabletop version of weather patterns in the sky. In this weekend, project by ben krasnow you’ll be able to build your own hypnotic cloud table by filling a cheap lazy susan with rheoscopic fluid and then dropping the assembled turntable into a modified coffee table from ikea. You’Ll need the following parts for this project plus you’ll need these tools we’ll start by modifying the lazy susan flip it over and choose any of the four holes near the periphery, using the hole as a starting point cut a three quarter inch by one and a Half inch rectangular opening with a dremel or similar tool, as shown be sure to only cut through the base of the turntable.

Not the turntable itself place the turntable right side up and drill. Two 5 16 inch holes spaced one inch apart, use a craft knife to carefully cut away any burrs left by the drill then clean. The interior of the disk of all dust and label residue now we’ll attach the top of the disk apply a continuous, consistent bead of e6000 adhesive to the turntable’s rubber edge.

The glue should completely cover the highest point on the edge check out the project page for additional tips to help you along remove one of the protective films from the 16 inch acrylic disk and slowly lower the disk straight down onto the adhesive eyeballing it to keep It centered apply very light pressure to seat the disc onto the rubber. If there are any gaps in the adhesive bond, you can fix them later, but do not reposition once the contact with the adhesive is made. If the seal looks a bit messy, that’s fine! We can always clean it up later on give the glue at least 24 hours to fully cure, while we’re waiting for the glue to set up we’ll modify our table, starting with the circular table surface, facing down measure out an 8 inch radius on a circular, drawing Tool and using the existing hole draw a 16 inch. Diameter circle drill a hole as a starting point and then use a jigsaw to cut out the center circle. Remove the center piece attach the two top supports to the bottom of the table and use the hole you just cut to mark the supports use these marks to cut a notch in each support that is three quarter inch deep and 16 inches wide mask the edges Of the wooden supports and the top and bottom of the table surface and paint the cut wood using matte black spray paint once the glue on the turntable has had enough time to cure it’s time to fill it with a fluid. Pour out a cup of the distilled water to make some room in the jug and then add half of the bottle of pearl swirl.

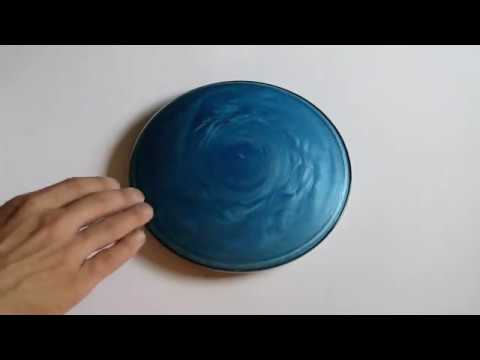
After shaking it vigorously add a few drops of food coloring, then cap it off before inverting and shaking the bottle to mix it thoroughly place the turntable upside down and then rotate the base that the two drilled holes line up the rectangular hole and then prop up That end, using a scrap of wood place the funnel into one of the holes and then use it to fill the disc with the rheoscopic. Fluid periodically, stop and shake the jug to make sure the fluid is well mixed. Keep filling until the disc is completely flooded and water spills from the holes insert a well nut into each hole and then place a screw into each nut and lightly tighten turn the disc right side up and check for air bubbles. Eliminating all of them is very difficult, so be sure to check out the project page for tips to help you do this flip the table over and then use a craft knife to cut the protective film just inside the glue seal. Keep the knife stationary and spin. The table to keep the circle consistent, peel away the outer strip and then using several coats of matte spray paint paint the outer ring, let the paint dry and then remove the inner circle of the film assemble the legs of the table according to the manufacturer’s instructions. Attaching the legs to the table surface is much easier. If you do it, while the table is face down flip the table over and then place the rheoscopic disc into the recess in the modified table, your rheoscopic coffee table is ready to enjoy place it in your favorite sitting.
Room or conversational space and watch as people are mesmerized by the hypnotic swirling patterns. What’S your favorite ikea hack, let us know in the comments below and thanks for watching, if you liked this video subscribe to our website or send us a comment on facebook or twitter. Be sure to check out our other project videos or visit us on makezine.com .