Hi, this is Wayne again with a topic “Make your own Battery-Testing Tweezers!”.
If you’ve ever had to sort through a stash of three volt batteries, you know that they are not the easiest things to test. Watch batteries and other coin cells are small and fidgety and can be really awkward to pinch between voltmeter probes, to test their polarity and to see if they have any useful life left. That’S where sean michael reagan’s battery testing tweezers come in. All you have to do is squeeze the battery in question to reveal its polarity and the charge state to build this weekend.
Project you’ll need you’ll, also need these tools. These heatsink clips are intended for close soldering work by clipping it near the iron excess heat will be drawn off into the large metal body of the clip instead of re-melting, the previous joint they’re made of thin plated spring steel that has just the right flex for Tweezers first take one heatsink and unhook. The jaws then cut off the rubber insulation with a knife and discard it straighten the heatsink by bending it and then hammering it flat over a hard surface.
If you don’t have an anvil, a smooth, concrete slab works. Fine. For this grab, one of the two jaws with a pair of pliers right where it thickens into the handle, then bend it back and forth until it breaks smooth and round the broken edge, with a file. Repeat this process with the second heatsink to create the second jaw of the tweezers using foam tape secure the two tweezer jaws, together with the edges, carefully aligned, now mark three points along the center of the top jaw at about one quarter, three quarters and one and One quarter inches from its rounded end, clamp and drill a one-eighth inch hole through the stacked jaws at each of the marks and then drill out the center hole to fit the led, separate the jaws and remove the tape assemble one of the jaws two standoffs. Four ring tongues and four standoff screws, as shown trim the long lead on one of your leds so that it will fit into the ring tongue once it is seated in the center hole in the jaw. Once everything is in place solder, the connection slip, a small piece of heat shrink tubing over the remaining led lead and apply heat to activate it bend this lead over and insert it into the ring tongue on the opposite side of the standoffs to the led in The jaw and solder it in place now mount the other jaw to the standoffs and then unmount the jaw with the led already installed and set it aside.

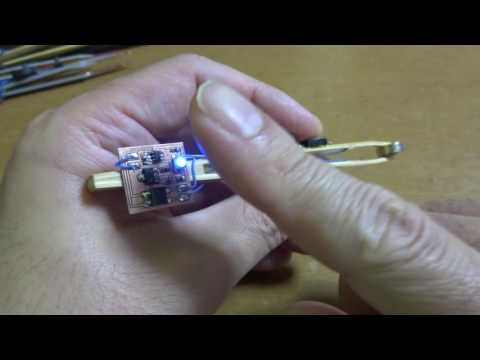
The second led is installed the same way as the first, with the long lead connected to the closer jaw and the shorter lead solder to the ring terminal attached to the opposite jaw reattach the first jaw tighten the screws down securely then work. A piece of heat shrink tubing over each jaw and apply heat to activate now you’re, set to test some batteries to use a tweezers grip, the insulation and squeeze to close the jaws across a coin cell. If neither led comes on the cell is dead and can be discarded if an led shines brightly. The cell is giving 3 volts or something close to it. If it shines softly, the cell is giving 1.5 volts the led that lights up indicates the positive side of the cell. This tool makes quick work of sorting the most fiddly and difficult to wrangle batteries, whether you’re making a soft circuit or an led throwy.

The fussy button cell will no longer hold you back. Let us know what you make using small 3 volt batteries in the comments below you. .