
Hi, this is Wayne again with a topic “How to Make Greeting Cards With Keynote on iPad”.
Foreign, hey, I’m Justin Tech, and today I am designing a holiday greeting card on an iPad that animates that you can send to your family and friends using the keynote app I’m designing holiday cards because it’s the holiday season, but this can be used for any holiday Or any greeting card, I’m going to be showing you all the tools you need to know on keynote to make that happen. So, let’s get into it. All I need downloaded on my iPad is the keynote app and that is a free app. You can get on the App Store. The first thing I’m going to do to get started is open up keynote. I’M going to create a presentation from there. I’M going to choose a theme and the theme is going to be pretty basic because I’m going to be adding a lot of assets to this, so I just need a simple white background.
I don’t really like this aspect ratio. I want to change it to a square, I’m going to go to the dot dot dot in the top right. Then you’re going to go to document setup, and here is where at the bottom it says slide size. This is where I can change from a range of different dimensions.
Now I’m going to use square, but if I wanted to, if I wanted to make it like the size for a phone, I could go into custom and make this top one 1080. And then I can make this one 1920., and that would be the perfect size for if I was going to send this like on a cell phone and wanted that, like vertical aspect ratio, but I personally want the square for this earlier this week we took a Bunch of photos of me wearing a Santa hat for my holiday card, got a bunch of different faces and actions that way I can play around with them on the iPad and place them into the invite. Along with that is, I went on Safari and I downloaded a bunch of different translucent images. Now I got these just by searching holiday, ornaments or holiday pngs with transparent backgrounds. So, with those photos I took on the photo shoot, I used the new ability on iOS 16 on my iPhone to isolate myself from those photos and then airdrop them to the iPad. That way, I had pictures of myself with a transparent background and I can use them like clipart.
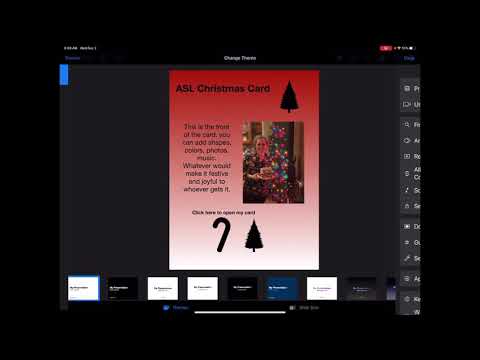
I am ready to make this invitation. Let’S go back into keynote and I have photos up side by side to multitask, and here I have lots of options now. The first thing I want to do before I start using all these images is, I want to make a wallpaper now. The wallpaper I like is this red one, but I think that it’s a little bit too bright right.
So what I want to do is I’m going to apply a background to this keynote and I’m going to make it black now, I’m making it black, because I’m going to use that back black background to darken this one right. So now I’m going to take this photo and I’m going to drag it into my presentation to darken this I’m going to click the paintbrush, because I have that photo selected and I’m going to make the opacity. Let’S see what I like. I think I like the opacity at about probably 50 51.

That looks good now, it’s time to start adding in some photos of yours. Truly, let’s drag that one in here and as you can see, I’ve got no background behind me. I can resize it like. So you don’t have to use the pen, so I can use my finger. Let’S see I kind of like that. Put me in the center on the bottom.
Let’S see what other options I have. Oh, that’s! A good smile – let’s use that one next, so I’m going to drag that in you’re, gon na be like this is the most self um. What is it when you like love when you’re, just like only think about yourself self-centered yeah, so I’m trying what I’m trying to do is create the most self-centered holiday card. Obviously, and next let’s use this one – this is a little more serious Justin. Look but that’ll add some contrast to these goofy ones go resize this one. So next up I’m going to add some of these decorations and let’s do one up here. That’S very large! I’M going to make that a little smaller copy that I’m going to tap over here and paste. It go to a range, and I can flip it horizontally cause I’m gon na put it on the side. Let’S put some ornaments throw some there get another little batch there we go now that we’ve got all those photos down on the card. I want to use the pencil to draw some writing I’m going to click this tool, so this tool is so that I can actually draw out what I want the text to say and it will type it for me.
Let’S just put Happy: let’s see, holidays there, we go happy holidays ooh, let’s do gradients, so I’m gon na do like yellow on top and then on the bottom. Maybe like a white, it’s a nice gradient. Let me let me make this bigger, because you can barely see it, so let’s go to maybe 125. now it’s time for the fun part, and that is adding animations to this.
If you wanted to send out a static image, this could be good to go and I’m going to show you how to export this as a static image at the end. So if you’re happy with just static images, skip ahead, animating is pretty simple, so I’m going to tap on this photo of me, click that arrow and then animate on animate. You have a few different options. I’M going to be doing a build in because I want all of these basically building the invitation, so I’m going to add a build in and we have so many different effects to choose from so I already know the effects I want to use.
I’M going to go all the way to open and I’m going to have the flash bulb. I think that that’s a fun way to have me come on I’ve assigned that I’m going to click done in the top right and that one is good to go next. I’M going to do this other photo of me an animation and the same animation shows me what it’s going to look like, I’m happy with it done next. I’M gon na have this animation of me this one’s going to Sparkle on now.
I want to do the same animation to the words happy holidays, these animations, it’s also important to think about when you want them to play out and in what order. So I’m just going to show you that right now I’m going to go back to the animate section, and here we have a list of all the animations now currently it’s not in the in the order that I want it to be, I’m going to want Happy Holidays to come first, and what I’m going to do is I’m going to pair holidays with build one so now together, these are going to play. So if I press play it’ll show me when I tap those are going to come together now. I also want to have this photo of me come on along with that, so I’m going to click build with one.
I also want these two images of me to to come on together, so I’m going to pair this one with four now it would be these three coming on then these two, but of course I have a few more images I want to have come on before We export this now. What you can also do to make things a little faster is you can zoom out and you can select multiple images at the same time, so I selected these I’d want to unselect the background. So now I have these two. What I’m going to do with these two ornaments is I’m going to click group now these come together.
They are one image and then from there, I’m going to animate these as well. Look at that. I love a good Shimmer. So now we have all the animations done.
Let’S take a look at these animations and see what we think I’m going to tap through them. Oh look at that yay happy holidays. Now, let’s get into exporting because you’re not going to want to send someone a keynote file right. There are a few different options: the ones I’m going to show you are Movie images and animated.
Gif images is pretty straightforward. If I just wanted this to be a static image, I can go in here, export it and then send out that picture, but what’s even more fun are animator GIF. So what I can do is I can have this, be something you text to someone or even email to them and it will be a moving photo. I’M going to set it to a large large works. Now I’m going to export this, it’s exporting my my presentation. You can see the little animation here super fun and then I can share it so before I share it, I’m going to save it because I just want to take a look at it. So I’m going to open it up in photos here.
I’Ve got it and there’s my animation yay and it’s just gon na keep on playing on repeat the one major downside of doing the animated gif is that when you send it, it will come out as the first frame, which obviously has no information. So if you’re sending out an invite – and you want people to easily be able to see like the information just from like scanning at the photo – that’s not going to work with this, but I did find a workaround. So here’s my little trick.
I want to make this an exported movie, but what I want to do first, is I’m going to tap this slide and I’m going to duplicate it now. This is the duplicated slide that has the same animations. Now, with this one, I’m going to get rid of all of the animations, because I want a static option of this slide for this to work. So I’m going to take that go to the dot, dot, dot, go to animate and I’m going to go to this list and I’m going to delete all of these animations that I’ve created. So now I have a slide on the top that has no animations, and then I have the second slide that has all the fun animations I created. Next I’m going to export this as a movie.
So now I have that image and, as you can see it has the information I want easily scannable and you don’t have to play an animated gif to get it. I’M going to tap in here now it’s a 10 second video, and I don’t want that to play too long in the in the beginning. So I’m going to go in and edit and I’m going to cut out majority of that first slide and just keep one little frame of it and click done and I’m going to save that video.
So now, when someone receives this, invite here’s how it’s going to play so it just had that first frame went right away and then placed through and there you go. You have a holiday greeting card. If you found this video, helpful, fun or you’re gon na go, create your own greeting card be sure to give this video a like, and if you want to see more videos like this, be sure to subscribe to the website by clicking that button down below I’m Justin and I’ll text you later .