Hi, this is Wayne again with a topic “How to Create a Book or Booklet in Microsoft Word”.
In this article, I will show you how to create your own book or booklet inside Microsoft. Word, let’s get started so here I am in Microsoft Word and before you start writing up your magnum opus, your Masterpiece. The first thing you’re going to want to do is set up the correct layout for your book, so you’ll want to go up here to layout and look in the page, setup group and you’re going to want to look for this dialogue box launch button. Just click on that and then you’ll get the margins. Tab paper tab layout tab. Let’S look at the margins tab! If you go down here to this Pages section, you can switch the multiple Pages option from normal to bookfold. So you probably noticed that the orientation for this document changed it’s now set to be landscape so that you can fit one page on the left, one page on the right.
Next, you may want to go up here to the margins, options and change the gutter. For this book to be maybe half an inch or 34 of an inch or 1 cm, whatever you want to do now. This is important because if you really are going to bind this up as a book or as a thick booklet, if you use every inch of the paper, that’s going to be a problem when you fold the pages or bind the pages into a book or booklet. If there’s no gutter space, it’s going to ffect the readability of the text, it’s going to be hard for people to read words that are close to the center border here. So I’m going to leave mine at let’s say: 6 in next, I’m going to switch from the margins tab to the paper Tab and I want to make sure I’m picking the proper paper size. So I may want to go down here and choose let’s say: A4 and by selecting A4 it changed the width and the height, so I’ll switch back to letter size so that that you can see the difference. 8. 1/2 by 11 for letter, but switching to A4, is less than 8 and 1/2 and a little more than 11.

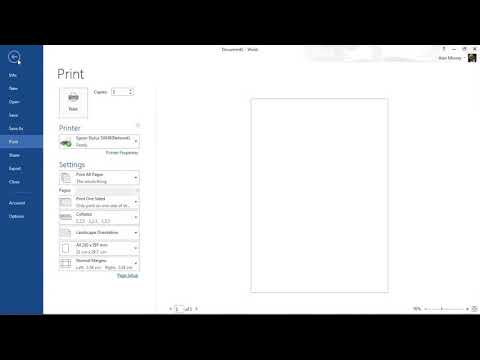
So my point here is just make sure that you’re picking the right paper size for what you actually want to produce. Now we can click. Okay – and I can begin typing up my booklet or book without worrying about how it’s going to be printed at the end, I can just produce the text. Wouldn’T it be nice if it were that simple okay, I’ve typed up three chapters of my book and notice, because I already set up the bookfold layout look what’s happening as I’m typing, as I’m entering my text for my masterpiece notice that on some pages the text Is a little to the right other Pages, it’s a little to the left! That’S because when this is printed, it will be printed in such a way that I’ll be able to fold the paper and staple it if it’s a booklet or I could have it bound and there will be enough space at the center of the book so that The reader can actually read the text comfortably when it’s time to print the book, especially if you’re printing. This yourself, you would go to file and select print and you’re going to want to see if there’s an option here for print one-sided, changing it to print on both sides. Now some printers are set up to automatically be able to print on both sides. If that’s the case, you can just choose that option. The other option that I’m getting is manually print on both sides and I’ll have have to reload the paper and it’s going to take a lot of work, but it is definitely possible to do now if you’ve ever tried doing this before. You know that it can be a little confusing and often times you end up printing, the second side of the page upside down. So here are a couple of tips for you to avoid that problem. If you’re connected to a printer that allows you to print on both sides automatically, you need to look for the option called flip pages on short Edge. If it’s got that option selected it and it should prevent your document from printing the back side of each page upside down, so look for that option. Flip pages on short Edge. If you’re. In my situation, where I can’t automatically print on both sides, I’m going to have to feed the paper in myself so to prevent the pages from printing upside down. I need to make sure I flip the sheets on the short edge of the paper depending on my printer and how it’s set up, and in that case, if you have to manually print it may take a little bit of trial and error.

But it is possible to do now in addition to printing your booklet or book. It’S also possible to export this or save this masterpiece as a PDF or other file type that can be shared digitally. So to do that, you could click here on file.
You could choose save as make sure you’re saving where you want to be saving, and then you could change the file type to be PDF. Pdfs can be read by e-readers or e-reader software, and if you go here to export, that’s another way to create a PDF. Just below export there’s an option to transform this word document into a web page, so I could kind of publish my booklet or book digitally by clicking transform.
It would create an online version of this document that people could read. It would be public on the internet. So in this article I’ve shown you a couple of the key things that you need to do to get ready to write up and create and then eventually print or publish your own Microsoft, Word, booklet or book. I hope you found this video to be helpful.
If you did please like follow And subscribe, and when you do click the bell and you’ll be notified. When I post another video, if you’d like to support my channel, you can click the thanks button below the video. You can also support me through my patreon account, and by buying Channel merch and you’ll, see information about those options in the description below the video one of the other very best ways you can support. The channel is just by sharing these videos with other people that you know that may need this important information. I’D really appreciate it. If you did share this content with your friends and family and co-workers. Thank you. .