
Hi, this is Wayne again with a topic “Creating Virtual Tours in Google Earth”.
In this tutorial, I will show two different ways in which you can create tours in Google Earth. The first thing I’m going to do is go over here to the left in this places window in Google Earth, and I will right click where it says my places when you do that it gives you a pop-up menu and the first item in the menu is Add so I want to add a folder, so it pops up with a little form to fill out to describe this new folder, I’m just going to title it and if I want to, I can do some other things. I could describe this folder and I could add an image, but I’m just going to leave it as it is click. Ok. So now you can see in my places there’s a new folder, it’s empty. It’S called places. I want to visit the next step in creating a tour of these places is to fly to the first location, so I’m going to use the search window in the upper left corner to fly to some places.
So here’s the the first stop in the tour and I can now zoom in to whatever level I would like the viewer to be able to see. Ok what you know. What’S the view that I want them to see. So how about that right there now you may notice that I have a whole bunch of little icons up on the screen.
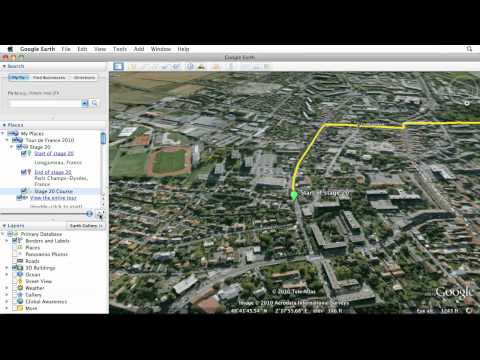
There’S little squares, there’s letters and all these things kind of popping up on the screen that shouldn’t affect or ruin my tour in any way. But if those annoy you all you have to do is go down here to the layers window and you can uncheck everything or if you want, you can just uncheck photos and places, and that should make it look more like an aerial photo alright. So I want this to be the first stop in my tour. The next step, then, is to add a placemark, so I’m going to go up here and in my toolbar across the top and click add place mark when you do that, you get another form that pops up to that. You have to fill out and you also get this pushpin or tack.
Usually it’s it comes in and yellow. Now I can click on that and move it around as long as this form that popped up is open, when I close that now that thumbtack is stuck – and I cannot move it. If I just really need to move that, I would have to right-click on it and choose properties. Then I get the pop-up again and now I can move the the tack or the pin all right. So I’m going to name this and I am going to describe this in addition to typing up a description.

I can add a hyperlink if I want to just by clicking, add link, and it gives me a form to fill out. You can just type in or you could go out to the web and copy a URL and then paste it in either way, I’m just going to click, OK and what it does it puts in some code, some HTML code that will make this hyperlink actually work. Next, let’s say I want to add a picture of this location. I can just click, add image and then there’s a form or a little entry box and they need to post in the URL or address of a picture.
That’S on the internet. It has to be a picture that’s out on the internet, so I’m going to do that. I’M gon na go ahead and open Firefox, so I’m just going to go to google.com click on images in the upper left, corner and I’ll. Do a search for the place that I’m making this to work, stop four, and here it is lots of pictures to choose from. Let’S say I want this picture. Normally, it’s a good idea to click on the link and then click full size image and get the highest quality picture to use.
In this case, though, if I were to get the highest quality full size image, it would overwhelm my description. It would be so big so at least in most cases, so I just want this smaller size photo now what I’m about to show works best in Firefox, just a heads up, so I’m going to right click on this picture and I’m going to go down and Choose copy image location, sometimes I’m tempted to click this other button, copy link, location and it doesn’t seem to work as well. So you should go down here. Copy image, location, click that now back in Google Earth. I can just click and paste. I’M going to do.
Ctrl V or on a Mac command V, and then click, OK and it puts in the code necessary for my picture to be in now. There’S other things I could do as well. I could click your on style and color and I could change the label color. The icon, color and different things like that, you can, you can also click view and type in specific latitude and longitude and those kinds of things and also altitude, but for the most part yeah.
I really don’t change those very often one last thing before I click. Ok notice that you can change what your pin looks like it/i or tack. If you click on that it lets, you switch I’m going to change mine too, to green and I’ll. Just click.
Ok, so you can see. Now the pin is green, so I’m going to click. Ok, I’m done with this place mark. So here’s the first stop in my tour and you can see that when I click on the pin it brings up what I typed here’s my title: here’s a description and a link that I typed in and here’s my picture that I inserted all right now.
Let’S look at where it placed my my place mark, it looks like it put it underneath my folder called places I want to visit, and sometimes that will happen, usually it the reason it does. That is because maybe I hadn’t clicked here on the folder before I put the place mark in that’s a common problem, so I would like to get this place mark into this folder. To do that, all I have to do is click on the words any type of any place here, that’s text, the description works really well and then just drag it and drop it on to the folder and you’ll see now. My first stop in the tour shows up as being inside the folder. You can tell that because it’s indented next I’m going to fly to my second stopping the tour, but to prevent that same mistake from happening again, I’m going to first before I fly there, I’m going to click here where it says places I want to visit and Then I’ll go ahead and fly to my second location again, it’s I have the option of zooming in. I could change the tilt.
You know the angle. If I want I’m basically arranging the view that the the people that watch this will see when they take my tour, so that’s what I want them to see right there, I’m going to add a second place mark now and notice. I have my folder places. I want to visit highlighted so when I click the pushpin or the tack. It should add this into my folder and I’m not going to go ahead and add another picture and a link I’m just going to stop there, but I click. Ok – and you can see what happened.
It did add. This second stop in the tour inside the folder, and that’s that’s what you want, so you don’t have to click and drag and put it in manually. So from here I could just keep going. I could just keep making sure I’m clicked on places I want to visit, go up here to fly or to – and you know I could continue to do this, but you just repeat those steps over and over until you build the tour that you want for people To to be able to see now, when you’re done, how do you show the tour? Well, the way you do that is by going back to your places, so I’m in my places window you click on the tour that you would like to show and then you’ll see a folder with a play button, and if you click that it starts the tour It goes to your first stop in the tour flies in to the to the right altitude and distance that you set and it’ll stay there for a few seconds and then it’ll move on to the next stop.
Now, if you want to stop and talk about this, stop in the tour, you would have to click the pause button. Okay. So if, if I were using this in a clean school, I would pause it at each location and click on the pin and also teach the students to do that, so that they have time to really learn from each stop in the tour. Alright.
So that’s the first method of creating a tour now before we move on to the second. I also want to show you how to save this to your computer, because, as it is right now, this is a nice tour, but it only exists on this computer and inside of Google Earth. Well, I would like to save it to the desktop and maybe send it to some friends or you know. Students need to know how to be able to send this to it to the teacher as a project so to get this out of Google Earth and saved to the computer. The way you do that is just by clicking on the folder that you’ve created. So I click on my folder places I want to visit and then, with that highlighted you can. You can export it and there’s a couple of different ways. You can do that.
I usually just right-click on it and choose save place as and it lets me save it wherever I want to. Typically on my desktop – and I usually save these as KMZ files, but you can also save as KML files. So I’m going to save to the desktop and you’ll see now on my desktop here. Is my Google Earth tour? Okay? So now, let’s look at a second way to create a tour in Google Earth. The second method is is a little different. Instead of relying on typing and descriptions and inserting photos, the second type of tour is just a recording of what I say and the places I go in Google Earth. So to demonstrate this, I’m going to create a second tour and I’m going to go to my places. Click on the word, my places and with that selected I’m just going to go up to the top of the screen and you’ll notice that there’s a little icon of a camera looks like a video camera and I’m going to click on that and you’ll notice that This little tool pops up at the bottom of the screen and it has a microphone symbol and then a record button, and at first this was confusing to me.
I thought I had to click both of those or I don’t know it was hard for me to figure it out what I was supposed to do, but the trick is: if you want to do a narrated recording, you would click the microphone. If all you want to do is record the places that you visit, then you would click the red record button. So let’s say I want to do a narration. I would click this.
A recorder comes up in this case, I’ll just go ahead and and click the record button. Ok, so now, at this point, everything I do in Google Earth will be recorded. Now. If I had clicked the the microphone button, then it would also record my voice as well.
Ok, so I can just move from place to place. I could talk about the places I’m showing ok or while it’s recording, I can fly to different locations, and all of this is being captured by the Google Earth recording tool. I’M going to go ahead and stop that and what happens next as soon as you stop the recording it rewinds it and it plays it. So you can see what you have recorded and that’s what’s happening right now on the screen, so I can see it worked.
If I had recorded my voice, my voice would be playing as well so that I could hear and make sure that that worked, I’m gon na go ahead and stop that. Let’S say this is something that you want to keep it turned out. Well – and it’s it looks good, all you have to do is click the Save button. It’S right here and I need to title this now.
I can describe this tour just like the other one. If I want to, I can add an image or a URL, but I’m just going to stop there. Click, OK and you’ll see it was added now this to where I just recorded, was added in my places at this point, it’s fairly similar to the the previous tour that I showed you. If I want to save this to my desktop, I just click on it.
Oh before I show that notice that you can click this button here to play the tour at any time, but to save this to my desktop I just right-click on it, choose save place as and save to the desktop alright. So hopefully you can see the differences between these two types of tours. The first example is great for including photos in your tour and typing text and information that way. The second is great for narration and practicing oral.
You know verbal communication, but the only visuals you can really use at least very conveniently are the ones that come with. Google Earth have fun creating tours in Google Earth. .