Hi, this is Wayne again with a topic “Building Up To Maker Faire: Body Filler Tutorial”.
Hi my name’s Sean Thorson. I make props and costumes for all sorts of different applications and this year to get ready for the Maker Faire, I’m building a giant bad guy robot from the original Robocop movies called ed-209. It’S going to be everything I can do to get it done just in time for the event, and here we go so sure I’ve mentioned most of the carpentry that I’m actually doing for this project is really horrible and in order to make things a little bit Faster, I’m not actually worried too much about how the seams line up. Instead, what I’m doing is I’m getting to the point where it’s pretty close to how I want it and then actually just filling in a lot of the gaps with an automotive body.

Filler also known as bondo, it’s originally designed for fixing small, dents or wrinkles, and you know a damaged car. When it’s done it cures rock-solid, you can sand it drill it machine it all kinds of things. I use it because it’s cheap, you can get it at any hardware, store or automotive parts store and it turns out I’ve been using it for an awful long time.
So I’m really familiar with it. It’S actually pretty simple to work with we’ll start. We’Ve got this bucket of grey goop all right, so this is basically part a we’re gon na scoop out a dollop.
This particular tools made just for scooping out dollops you’ll notice. That’S all I’m doing with it, because we don’t want to contaminate the bucket with any of the actual mixed material. Next thing is we’re gon na mix in the catalyst all right.

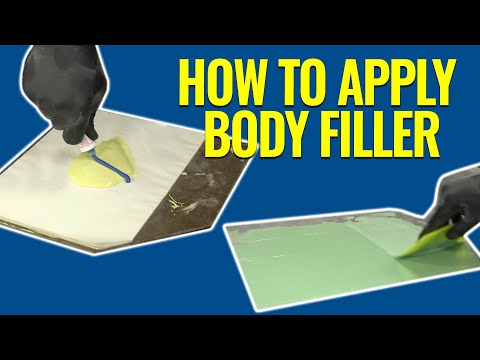
You know I’m kneading the tube in order to make sure that everything is evenly mixed. So after blending, everything in the tube I’m gon na squeeze out a bead like so all right, the ratio that they give you on the can. They say for a golf ball sized lump of your main part. You need a one and a half inch long. Bead of the cream hardener out of the tube. Now, when you’re mixing it I’m using a putty knife and I’m mixing on a clean, non-porous surface, you need something that’s going to be easy to clean off afterwards, so that you don’t end up with the residue of the cured material.

That’S gon na contaminate your next batch and make it cure too fast to work with. So I’m gon na scrape up a bunch of this stuff and then basically fold it back over itself and start mixing. Now, when you’re working with bondo, one of the best things you can do in order to keep control is to make sure that you only get the material on one side of your tool all right. So you always want to keep one side clean. Otherwise little ribbons of it are gon na come off the backside and it’s gon na be hard to make it nice and smooth and flat when you’re actually doing your filling now you’re gon na blend this until your color is pretty consistent, you want to make sure That it’s all one color, you can still see some streaks in there. It means I’m not quite done mixed now we’re getting the point where the colors pretty consistent, the exact right color.
You get yourself one of these flexible spatula tools that they sell and when it’s just the right color, it should be exactly the same. I’Ve mixed it a little darker. That means it’s probably going to end up curing a little bit too fast, so means this batch. I’M gon na be in a hurry to use, so I’ve got this gap on this piece here.
This is the knee and then I’m gon na fill in the gap just like spackling seams in drywall, or any one of a million other applications where I’m gon na be spreading this material and then just trying to make it smooth as I’m working it now when It cures it’s gon na be rock solid, but you can still send it. You can use power sander, you can just hand sand it. The idea is to get as close as you possibly can with just one pass. If you do have to do some major shaping it’s ideal to get to it when it’s still fairly fresh, so that you don’t have to work quite as hard, you get it while it’s still just a little on the soft side, and you can actually carve a Lot easier, but you want to actually clean off your tools as quickly as possible, because if you wait it turns solid and then you basically have to grind it all off or carve it away with a knife that sort of thing I just splashed a couple: ounces Of acetone on top and the next step is just kind of scraping everything a little bit so that nothing actually sticks to my mixing plate.
And then I end with a piece of paper towel to wipe all of that off before it cures and become solid. On the plate, now I have an entire wall in my workshop that rolls out of the way, so I get fresh air in here. If you’re working in a more confined space, the acetone will make you kind of stupid, really quick. So you really want to have lots of ventilation when you’re working with this or just wear a respirator.
So at this point I’ve got most of a leg put together when you tune in next time. These pieces are going to be turned from really horrible examples of carpentry into some really impressive pieces of fiberglass. You .