
Hi, this is Wayne again with a topic “Apple Mac Studio & Studio Display – Unboxing & Overivew”.
Hey what’s up folks how’s, it going so watch hope you guys are all doing well and today i’m going to be taking a look at what comes inside all of these boxes. My suspicion and, as you know, from the title, it’s going to be the new mac studio setup, including the standalone pc, as well as the display itself. We also have the magic keyboard and mouse configuration we’re going to first dive into the mac studio. Now i configured pretty much the cheapest variant of the mac studio with the 10 core m1 max chip 24 core gpu, as well as 16 core role engine. You also have 32 gigabytes of ram and 500 gigabytes of long term ssd storage. Now, as you can see from the packaging, the mac studio is fairly compact.
Essentially, the box is slightly larger on what you would find a mac mini in now. The unboxing process is fairly simple and straightforward, as you would expect, with apple basically have the product center stage, and on top of that, you have some of the paperwork, including the quick start guides and a larger apple sticker to get access to the computer. You basically pull out at the borders and it’ll elevate at the product, making it easy for you to just pull out the mac studio.

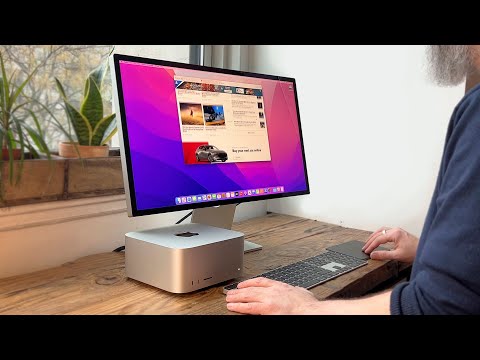
It’S encased in this a paper protective covering just below that you have the braided three-prong power, cord, making setup really simple and straightforward. The power supply is built in to the unit itself, and once you have the protected covering off the mac studio, you can see that the design is still super clean and compact, basically double the size of a standard, mac mini and really the big highlight over here. Besides the internal capabilities and expandable options, you have, when you initially configure your mac mini, is the fact that you do have a lot more ports that connectivity options. Firstly, at the front, you can see two usbc connections as well as a full-size sd card slot.
At the back, you have a plethora of connectivity options, including four thunderbolt: 4 connections, a 10 gigabit ethernet connection, two usb type: a 3.1 gen 2 connections, a full-size hdmi, as well as a 3.5 millimeter headphone jack. Beyond that, you also have a built-in speaker, as well as a bluetooth 5 and wi-fi 6 wireless connectivity options. Now it’s important to know that the mac studio does not come with any accessories or peripherals.

So you’re going to need to supply your own mouse and keyboard. And if you’re going to go with an all apple setup might as well go with the new magic mouse and magic keyboard with the touch id integration, as we have now move on. Let’S take a look at what comes inside the new studio display. This is the 27 inch 5k retina display and that’s going to be perfect for the new mac studio and basically the unboxing is very simple again very similar to the max studio experience where the product is pretty much right down the center and you simply spread apart At the borders on the left and right side of the box to get access to the monitor, and it raises up automatically for you to easily access now, just behind the display you’ll find a box that contains the thunderbolt connection. That’S going to hook up from the display to the mac studio itself, it’s a little bit short.
My estimation would be about a meter and a half in length. It is a nice braided, cable though, but it should be fine for most people that are setting up on a single desk, with both the mac studio and display fairly close in proximity. Now, one important thing to note is that the power cable is actually built into the studio display. So you actually want to be careful when uh trying to remove this packaging, because you don’t want to force the cable out in any way, since it’s actually not removable by itself.
The studio display is a wrapped in this eco-friendly packaging. It’S kind of like this paper material, similar to what we found the mac studio encased in so once you remove that you then peel off the outer screen protective layer for the studio display and there you have access the setup process for everything was super simple and Straightforward basically got up and running in less than three minutes now for the next couple of days, we’re going to be working on our full review of the studio display, as well as the mac studio, so definitely make sure you subscribe to the website. Have post notifications turned on and have liked and shared this content? Big thanks to you guys for all the support check out the description down below for more details and we’ll see you real soon in the next one. Take care .