Hi, this is Wayne again with a topic “Mail Merge Envelopes in Microsoft Word”.
In this article, i will show you how to create hundreds or even thousands, potentially of envelopes, each with its own distinct address to be sent out to hundreds or thousands of different people and we’re going to do this in microsoft. Word. If you haven’t already watched my tutorial on how to do a mail merge in microsoft word also using microsoft excel. You should definitely watch that previous video, but in this article we’re not going to focus on mail, merge documents or letters, but rather on the envelopes that they go in. So here i am in microsoft word and if you did watch that previous video, you know that i’ve already mail merged the document itself. But now i need envelopes for those documents to go into and i’m starting just in microsoft word with a completely blank page. But i also do have in microsoft, excel a contacts list with information like people’s names, addresses phone numbers, the city they live in, etc, and you can get a copy of this practice file. If you look in the description below and all of these are fictional people and names and addresses, so let’s look at how i could create an envelope for each of these people on this contacts list and to begin i’ll, just go to microsoft, word and i’ll. Go to the mailings tab so that i can see the mailings ribbon and here in the start, mail, merge group, that’s where i need to do my work now.
I know it’s tempting to go here to the create group and create an envelope that way, but this is really just to create one envelope with just one address, etc, so you don’t really want to go there. Instead, you go to start mail, merge and choose envelopes. At that point, i get a pop-up with some options for my envelope now, i’m using microsoft word in 2020.. If you have an older version of microsoft word, this may look slightly different, but the idea is the same, and that’s probably true, also of future versions of microsoft word. So the first option i have with envelopes is to change the envelope size. Probably the most typical size of envelopes in the us is size. 10. So you can see the dimensions here, but if you need to or want to, you can change the size of the envelope, i’m going to stick with size 10.. Next, i can change the font type for the delivery address. So do i want it to be agency. Fb, you can see a preview of it here. Do i want it to be georgia pro light? I could make it bold. I could change the size of the font as well or even the color. In most cases, you’re not going to want to change those at all, so i’m going to cancel that, but i just want you to see that it is an option.
Next, we have some positioning options for the envelope we have from left and from top and by default it should say auto and in most cases that’s what you want to leave it at, but once you’ve done your mail merge for your envelopes. If you find that the spacing is off a little bit, this is where you can make some adjustments here in the from the left box. If i click up, it will nudge the delivery address one way or the other, and you can also just type in the exact number i’m going to switch back to auto. In most cases, that will work for you also from top same thing, we can nudge the delivery address in a different direction.
Next, we have similar options for the return address here in the upper left of the envelope very much the same as the delivery address options. Now, next to envelope options, i also have printing options, and if your computer is connected to a printer, the default option will probably be the one that you’ll want in order to make it work with that printer. But you can also switch if you need to you. Can try out different orientations, different options and we also have some feed options here. We can do a manual feed or a tray feed, just lots of different options to try i’m going to stick with manual in this case and i’ll click. Ok. Now, when i click ok, this page is going to change its layout and it’s going to look more like an envelope in order to see that i’m going to have to zoom out a little bit.
But let’s first click. Ok, i don’t know if you noticed the subtle changes, but if i zoom out you can see that this is now formatted and laid out as if it were an envelope now it’s time for me to pull in the information from my excel spreadsheet. So here in word i’ll, just click select recipients.

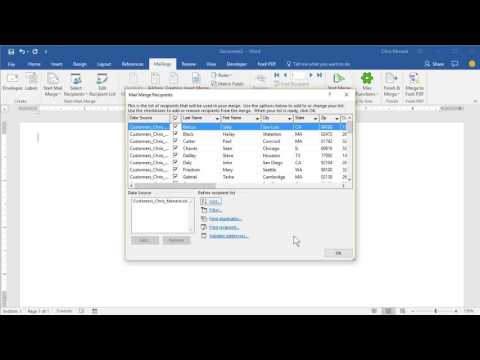
At this point i could manually type a list of all the recipients, but let’s assume that i have a thousand people. I need to send envelopes to that’s not going to be a good option for me, so instead i’ll click use an existing list and then all i have to do is navigate to the folder on my computer, where my excel spreadsheet is kept. Where is the sheet that has all of the recipient, names addresses, etc, and i found it and i double clicked on it now that i’ve double clicked on it? I just need to verify a couple of things: does my data have a first row that contains column headings? If i go back to excel, you can see that it does. These are column headings, so i need to make sure that that’s checked and then i need to make sure that the right sheet is selected in this case.
There’S really only one sheet. So that’s an easy decision. I can click, ok and it seems like nothing happened, but in reality, i’m now ready to merge information from excel to microsoft. Word onto this envelope before i actually do that, though i could go here to the upper left and type in a return address. So that’s the return address name and then i can tap enter on the keyboard put in a street address, hit, enter put in a city, comma state and a zip code. Now that i’ve got the return address, i need to put in the delivery address and it doesn’t look like there’s anything on the screen here. But there actually is there’s an invisible text box and if i click down here somewhere, you can see the outlines of the text box. Next i can use this address block button and or the insert merge field button to put in the recipient’s address.
Let’S try address block if i click that it will try to automatically piece together the names and addresses of the recipients. But if you look closely, it didn’t quite work. The street address is missing and if i go back into excel, you can see that there is a street address. It’S just that i called it a business address instead of a street address. So how would i fix that? Well, in microsoft word i can go in here to the insert, address, block, pop-up and choose match fields here. It says: address 1, not matched.
All i have to do. Is click this drop down and choose business. Address click, ok and look that has now fixed the delivery address for martin smith, and i can test it out for the next person as well.
Adrian thomas, it looks good to me and ellis arrebelo same thing looks good, so that is one way to put in the delivery address. Just use this button here make sure that it’s correct if it’s not correct, match fields, and then click ok instead of clicking. Ok, i’m going to click cancel just to show you that you can also piece together.
The address yourself manually by using this insert merge field button and i’ll click on the bottom part of this and select first name and immediately word inserts a first name placeholder after first name i’ll need a space. So i just type space with the keyboard and then i can go back up to insert merge field last name and then at this point, i’ll tap enter to move down a line. Go back up, insert merge field company name that may or may not be necessary. Tap enter, insert, merge field business address. You could put a comma there if you want, you could put any other adjustments there, that you want to make i’ll just tap, enter again: insert merge field, city, comma and i’ll, put a space and then back to insert merge field state i’ll, put a space or Two spaces: if you want and then insert merge field zip code, so i have pieced together my own address block for this entire list of recipients. Let’S test it out and see. If it’s going to work the way we can test it is by going here on the mailings tab just go to the preview results. Group and click preview results.
So there’s ellis, it looks good, looks right to me, there’s douglas and i can just click these buttons to jump through all of the names or a few of the names to make sure that it’s working properly and it looks good to me. You can also do a search for a certain recipient to test out and you can check for errors. But at this point i’m satisfied that this is working and it’s going to turn out well, and so i’m ready to finish and merge now before i do that. I’M just going to jump back to the first record by clicking this button.
This is the very first envelope that will be printed and then i’ll click finish and merge. There’S different ways: you can do the merge, i’m going to focus just on print documents. Now, at this point, even though i’m confident that things are going well, if i really was going to go ahead and print 100 envelopes or a thousand envelopes, i would not print all of them the first time. Instead, i would just print the current record, in this case the first envelope just as a test to make sure that this is really working and that i’m feeding the envelope correctly oriented the right way.
And then, if that works, then i could go back and do this again and print all. Let’S look at what happens when you do a print all. I click ok and this pops up with the typical printer options that you’re used to seeing. I can switch printers with this button here, adjust properties etc.
Now, if i click ok, it will begin the process of printing all of these envelopes. So that’s how you do a mail merge for envelopes in microsoft word, but also using microsoft excel. Now. If you find that to be intimidating, you can do the same steps by clicking here on start mail, merge and choosing step by step.
Mail, merge, wizard. Some people find this a little easier honestly. I don’t necessarily find it easier, but it does walk you through the steps. So if you’re brand new to this idea of doing a mail merge, you might want to use the wizard again, you would use an existing list and then click next and then it gives you some tips on how to proceed.
And then you would click next again to preview and next again to complete the merge. So it is good to know that that does exist in case you get stuck and need a little guidance thanks for watching. I hope you found this tutorial to be helpful. If you did please like follow and subscribe and when you subscribe click the bell so you’ll be notified.
Whenever i post another video, if you’d like to support my channel, you can do that through my patreon account and you’ll see a link to that in the description below .