
Hi, this is Wayne again with a topic “Tron-Inspired LED Slab Table”.
Hey i’m bob from i like to make stuff today, i’m going to show you how to make a tron inspired coffee table. I started out with this beautiful slab of maple that i’d gotten and trimmed off the edges so that they had straight lines. I got rid of some jagged stuff but tried to leave as much of the wood as i could. I also had some barn wood and i trimmed down one piece about the same length as the slab by laying them on top of each other.
I was able to transfer the diagonals from the slab onto the barn wood. I traced the profile of the slab and then drew another line about one inch away. Then i trimmed off the diagonals.
With a circular saw, then i used a jigsaw to cut along the one inch offset line. I cut a few more strips of the barn wood to act as an outer band of the table. I flipped the pieces over and then lined up where the edge bands would sit. I needed to cut some angles, so a lot of it was just setting the pieces in place and then marking the angles, cutting them, setting them back in place and marking the angles again kind of trial and error when you’re working with old wood.
Like this, that’s not exactly square. I also traced the profile of the slab on one end and cut that out on the bandsaw i put on quite a bit of wood glue between these pieces to hold them together. Once i got them in place, i used brad nails to hold them, while the glue would dry once it was all held together. I could stand it up and then pre-drill some holes to add some finishing nails. The combination of two inch, finishing nails and wood glue, ends up being pretty strong.
I used a piece of melamine and covered it with some paste wax to make sure that nothing would stick to it. Then i put the table top on upside down. I clamped each piece down really well to get rid of any gap between the wood and the melamine.
Then i mixed up a whole bunch of two-part epoxy. I estimated the volume here based on the length, width and depth of this gap. I had a little bit left over, but it was pretty close, even though it was clamped down. A lot did spill through, so i sanded it off with a belt sander, make sure that you wear a respirator and have plenty of ventilation when you’re doing this. This dust gets everywhere, especially in the little holes that are left by bubbles, just clean those out with a brush and a vacuum, and then go back and fill them with a little bit extra epoxy after it was fully cured. I sprayed the back side of it with a frosted glass spray.
Then i needed to level out the underside, so i measured a few areas and cut blocks of wood that would fit in there. I glued them down and then held them in place with brad nails. I also glued on some scrap plywood about one inch back from the edge of my gap.
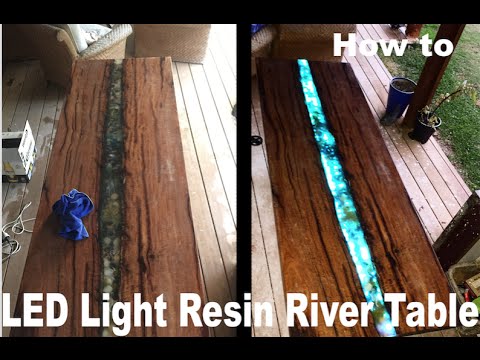
This is to create a little wall that i’ll add leds to in just a minute. These led strips are really inexpensive and often come with an ir receiver, a remote and a power supply. You can cut them to length at any one of the little markers which are about every three inches. They also often have adhesive backs to make it really easy to stick them to things after a fair amount of sanding, i flipped the table over and added some finish. I used a tongue oil finish, which ends up being a nice protective kind of hard finish without looking like a really heavy polyurethane. I just did a few coats and then the table top was done.

The base for this table is going to be made by sandwiching. Together several pieces of half inch plywood, i cut down a bunch of different pieces for all the different sizes that i need, including the sides, the top and a shelf. The side panels will end up looking like this, and the shelf will slide into that groove.

The shelf is two pieces of plywood, so i glued those together spreading lots of glue covering the entire surface once it was all lined up. I clamped it together for the glue to dry. After removing all the clamps, then i can move on to making the side panels. I sandwich two full-size pieces together and clamp them. Then i added the two short pieces onto the end. These are going to go under the shelf along the floor. When you have multiple pieces and lots of glue, clamping can be a little difficult because they slide around. Take your time, make sure to keep them lined up and then add your clamps as you go now once those dried removed.
All the clamps and i made a duplicate for the other side. I added glue to both side panels and then set the shelf in place. When you clamp this together, you have to apply pressure from two directions. You want to make sure that you get rid of all the gaps in between the shelf and the legs after this dried, i added two more panels to the inside of each leg. This makes it a bit stronger, but mainly it’s so you have a thicker leg and you see more plies along the edge. I added some glue to the top and put on the top panel. I made countersink holes for each one of the screws, so the screw head would set all the way down in and then screwed it on. I sanded everything down really well and then used the same finish that i used for the top finish like this really shows off the contrast in the plies and makes them pop.
The last thing was to drill a hole for the ir receiver. I made a smaller hole from the top to make sure it would fit and then flipped it over and drilled a larger hole from the bottom. Once it was in, i plugged everything up and screwed the box in place. Then i did countersink holes from the bottom to attach the top to the base, and here it is all finished, it’s unique.
It’S a conversation starter and best of all, my kids really like it thanks for watching and keep an eye out for more quick tips and projects from i like to make stuff on make you .